AxaraBlue
-
Posts
1,128 -
Joined
-
Last visited
Content Type
Profiles
Events
Forums
Posts posted by AxaraBlue
-
-
^ Vas is DAT?! It is PERDY!
-
Oh goodness kitten .... Forrest Gump strikes again. In any case Welcome to Ordo ... I hope that you have fun and meet many new friends here.
-
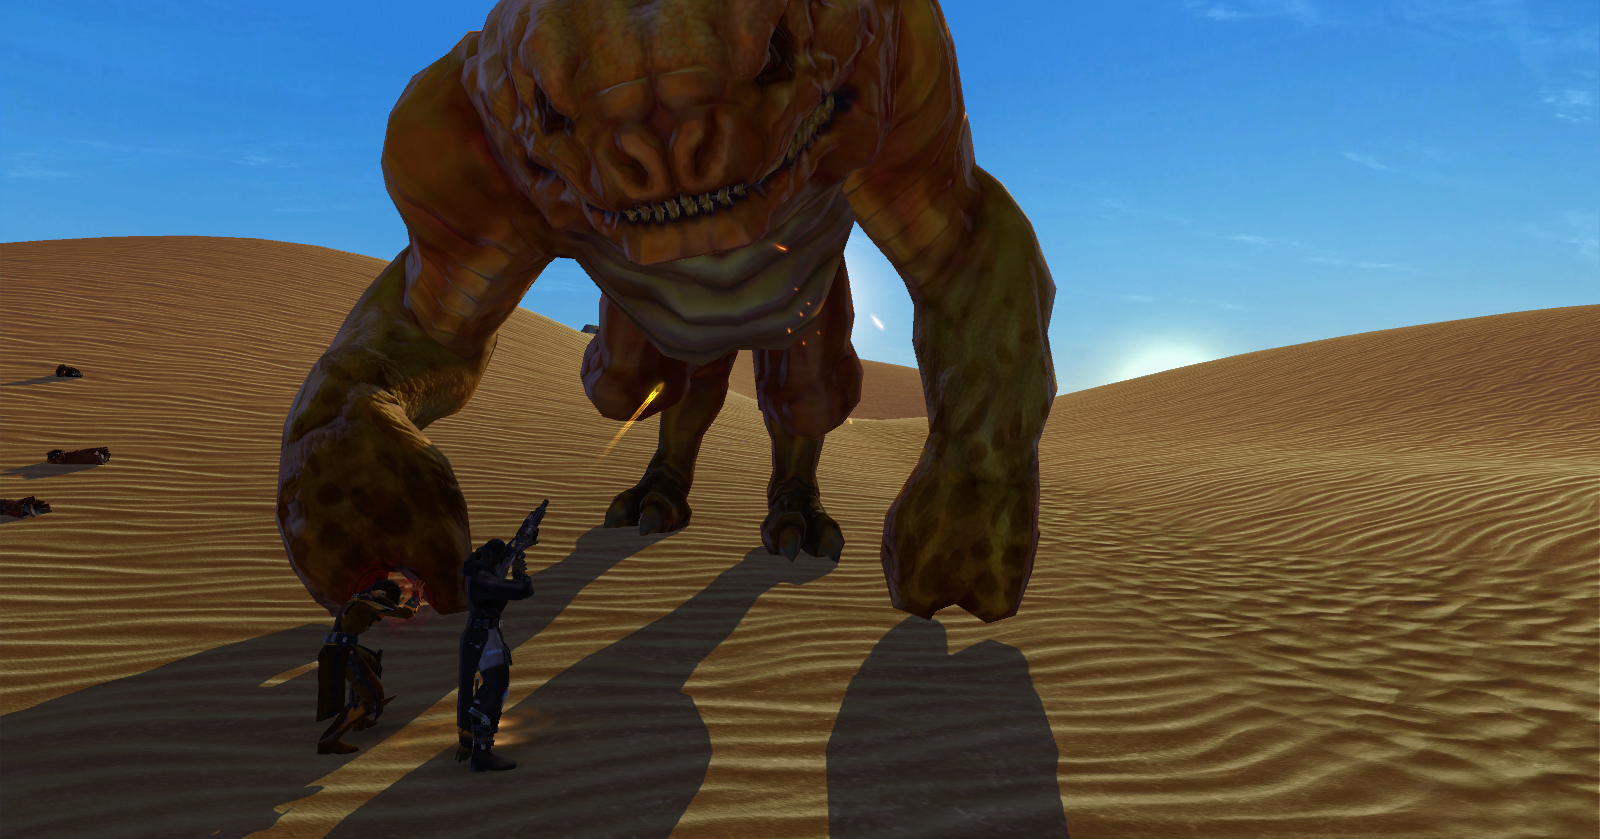
It was a really sunny day on Tatoonie. The twin suns were just killing me and my traveling companions. It was starting to seem like just a dream that we would find the beast that we were actually looking for. I spotted something in the distance and I couldn't shake the bad feeling that was about to happen.
"Over there. The skull in the sand with the bodies. I think this is the place." I said with a bit of worry in my voice.
You see I was just still an apprentice but the man I was with was a hardened Imperial Agent. He had seen much in his line of work and didn't seem worried in the slightest. He neared the skull and well I did not last long in the battle but he did. He faced the challenge and walked away with it's skull to mount on his wall.
-
Congratulations to everyone .... but ... when did Angelin start playing TOR? >.> xD
-
The Top 10 Lessons I Learned From Charlie Brown
1. It’s okay to be afraid... just don’t let your fears control you.
Charlie Brown often sat in bed and spoke of his fears, but no matter how scared he was, he always did the things he wanted to do.
2. Persistence wins out.
Charlie Brown often lost, failed at much, but he never gave up. Even though he knew Lucy was going to pull the football away before he could kick it.... Even though he knew the tree was going to eat his kite... Even though he knew his team would lose the ball game… he kept on trying.
3. It’s what you think of yourself that counts.
Linus carried a security blanket for years and his friends laughed at him. They also laughed at him because he believed in the Great Pumpkin. Pigpen was a walking cloud of dust and dirt and was often regarded unkindly. Both characters, however, were always proud of themselves and believed they were as good as anybody else – and they were right.
4. Sometimes you need to talk.
One thing the “Peanuts” gang understood was the importance of talking things out. Whether leaning up against Schroeder’s piano or atop the brick wall, they always discussed what was of concern to them.
5. Sometimes you need to listen.
Even crabby, self-indulged Lucy knew the importance of listening. She started the famous psychiatry booth where any and all could come and be heard.
6. Do what you love to do.
Through all their adventures, Schroeder remained constant in his appreciation of Beethoven and his love of playing the piano. He loved to play piano and that’s what he did, regardless of the circumstances. Charlie Brown flew his kite, played baseball and football, not just to win (he knew he wouldn’t), but because he loved to do those things.
7. It’s important to have friends that care.
The Peanuts gang was made up of individual characters, each with their own foibles and talents, but through it all, they were always there for each other.
8. Big dreams lead to big things.
Snoopy was the biggest dreamer of them all, but his wild imagination often led to even wilder, more fantastic adventures in real life. Snoopy knew that you must have a big dream if you are going to lead a big life.
9. Action creates reality.
As Charlie Brown was reminded time and again after prodding from Linus, it takes action to bring about change. Though he often failed, Chuck took action quite regularly – and every now and again, things would go his way.
10. Laugh every day!
While the kids themselves may not have seen the humor in the things they did, Schulz made sure that we did. Life is only as serious or as humorous as YOU make it. Lighten up. Go play softball. Fly a kite. Dance with your dog. Smile... it makes people wonder what you’re up to.- Angelin01 and DeumDeorum
-
 2
2
-
CHAT, COMMANDS & SHORTCUTS
 SLASH COMMANDS
GENERAL- /s - Say - Talks on local, this is to talk to players who are near your proximity
- /p - Party/Group - This is to talk to players in your group, no one outside your group can read.
- /g - Guild - Only members of your guild can see this text
- /y - Yell - Send a message to players in the area
- /e - Send a custom emote to nearby players (see a list of available emotes below)
- /1 - General - General chat means anyone in the same region can hear you
- /2 - PvP - Send a Message to the PvP chat channel
- /3 - Trade - Trade chat is for discussing buying/selling and auctions.
- /t [name] - Tell - /t Goshee Hello would send a private message to me saying "Hello"
- /afk - AFK - Set yourself as away from keyboard with an additional message too
- /dnd - DND - Do not Disturb, people trying to contact you will get a message that you don't wish to be disturbed
- /invite [name] - Group Invitation - /invite Goshee would invite me to your group
- /kick [name] - Kick Member - /kick Goshee would kick me from your group
- /who - Who - Shows a list of all players in the region and gives you search options
- /friend [name] - Adds a player to your friend's list
- /ginvite [name] - Invite a player to join your guild
CHANNELS
- /create [channelname] [password]- Create an Channel and an optional password
- /cjoin [channelname] [password] - Join an already made channel also including a password if needed
- /cleave [channelname] [password] - Leave a custom channel also including a password if needed
- /lock [channelname] - Allow only invited players to join the channel
- /unlock [channelname] - Allow all players to join the custom channel
- /cinvite [channelname] [player] - Invite someone to the custom channel
- /password [channelname] [password] - Set a password for the channel
- /password [channelname] - Clear a password from a channel
- /ckick [channelname] [player] - Kick a player from the channel
- /ban [channelname] [player] - Ban a player from the channel
- /unban [channelname] [player] - Unban a player from a channel
- /mod [channelname] [player] - Give a player the moderator status in the channel
- /unmod [channelname] [player] - Remove mod status from a player
- /mute [channelname] [player] - Remove the ability to send messages on the channel
- /unmute [channelname] [player] - Grant the ability to send messages on the channel
- /moderate [channelname] - Set the custom channel to only let moderators speak
- /unmoderate [channelname]- Set the custom channel to let anyone speak
- /channellist - List all custom channels you are on
- /list [channelname] - List the players on the custom channel
 EMOTES
All emotes can be accessed in game by clicking on the little waving man icon in the chat panel on the top left
NOTE: All emotes in orange have animations
EMOTIONS
- /Accuse
- /Angry
- /Blush
- /Bored
- /Comfort
- /Cower
- /Cross Arms
- /Done
- /Excited
- /Facepalm
- /Fear
- /Frown
- /Glare
- /Grin
- /Groan
- /Happy
- /Love
- /Mad
- /Mock
- /Mourn
- /Panic
- /Paranoid
- /Pity
- /Ponder
- /Praise
- /Raving Mad
- /Seduce
- /Fist Shake
- /Shy
- /Smile
- /Snicker
- /Tired
- /Whine
- /Wicked
- /Wink
GENERAL- /Beg
- /Be Right Back
- /Clap
- /Congratulate
- /Cry
- /Dance
- /Disappoint
- /Doh
- /Flirt
- /Follow Me
- /Goodbye
- /Good Job!
- /Hello
- /Laugh
- /Nerfherder
- /No
- /Point
- /Poke
- /Ready!
- /Sigh
- /Sit
- /Slap
- /Sorry
- /Spit
- /Stretch
- /Surprised
- /Thank You
- /Wait
- /Warm Up
- /Yawn
- /Yes
( More to be added soon )
-
 STARSHIP
- You will gain your starship after you finish a major class quest at your capital world (usually around level 16 or 17)
- Your star ship comes with its very own bank or "cargo hold" though they act as the same thing
- If your companion wants to talk to you and you are in your ship, now is the time to do it!
- To travel around the galaxy, visit your galaxy map
- Choosing a destination will cost fuel, the number of credits required to get there will be displayed along the bottom in green
- After your destination has been chosen, your ship will auto-align to the planet then jump-drive will be initiated
- Your ship will remain in Orbit around the planet until you use the ship's exit, a cut scene will then show you landing on the planets surface
- Any systems with current quests will have their quest name beside them, making them easier to locate.
- You also have a mission terminal beside your galaxy map which will give you new space missions
- Space Missions are done in the form of a rail gun style shooter. You follow a set path and have to shoot enemies along the way.
- Space Bar to do a barrel roll ^^
- Left clicking will activate your primary weapon (laser for example)
- Right clicking will activate your secondary weapon (rockets for example)
- Lasers have infinite ammo whereas rockets can only hold a certain amount
- You can upgrade your ship by visiting your character screen 'C' and clicking the 'Ship' tab
- Simply drag and drop modification into the designated slots for them to take effect
- The crafting skill cybertech can create space ship mods. Slicing also has a chance to get them and their schematics.
- You will gain your starship after you finish a major class quest at your capital world (usually around level 16 or 17)
-
 CONQUESTS
Please click HERE to learn about current Conquest Objectives. -
GUILD FLAGSHIPS & STRONGHOLDS
( Coming Soon )
-
 STRONGHOLDS
A collection of various guides related to Patch 2.9 Galactic Strongholds expansion.
FAQ
Q: Where do I go and get a stronghold?- A: Go to the fleet, you will notice the crafting area is now renamed to Strongholds & Crew Skills. There is a big hologram NPC you talk to in that area for the intro quest that will show you how to access the stronghold terminal etc. For the free Nar Shaddaa palace, you need to access the stronghold terminal and purchase it for 0 credits.
Q: How to I get to Manaan?- A: Go to your spaceship and travel to Manaan. If you have done Forged Alliances Part I there is a new quest to pick up at the fleet as well. Alternatively, you can simply queue up with group finder
Q: How do I do conquest?- press L and go to the newly added Conquest tab. There are a bunch of objectives for you to complete.
Galactic Strongholds
- Tor-decorating.com – Database/gallery of decorations and customized strongholds
- Galactic Strongholds Tours and Unlock Pricings
- Galactic Strongholds Decorations List
- How to craft prefabs and dark projects
- Where to find crafting mats
- Hooks guide
Guild Flagships & Planetary Conquest
- Guild Flagships tours and unlock pricings
- Planetary Conquest guide and objectives
- Conquest Commanders guide
- Planetary Conquest Items
Manaan Flashpoint
Cartel Market
- Gatekeeper’s Stronghold Pack items
- Stronghold Pack reputation vendor items
- Gatekeeper’s Stronghold Pack decorations
- Luxury Bundle decorations
- Cantina Bundle decorations
- Spacer’s Bundle decorations
- Utility Bundle decorations
Patch Notes
Links provided by Dulfy.net
-
 LEGACY NAME
- A legacy name is a server-wide surname used by all (current & future) characters on your server
- A legacy name is granted after you complete Act 1 (usually around level 30)
- After you finish Act 1 a new window pane will open asking you to choose your legacy name
- If you close this window, you can find it under the Skill Tree (K) and the Legacy tab along the bottom
- Be careful with what you pick, for once you choose you can't change it in any way (so far)
- You can use apostrophes (') and hyphen (-) symbols
- You can't use a space
- If you use a symbol, all letters after the symbol will be lower case, example: typing Lo'Saki would actually end up as Lo'saki
- After you pick a name you may choose to display it differently, this can be done in the preferences menu under social and the legacy subheading
- You can choose between one of three ways:
- HIDDEN - The Legacy Name will be hidden to you and all other players
- SURNAME - The Legacy Name will appear after your current name e.g. Inferna [legacyname]
- TITLE - The Legacy Name will appear underneath your name The [legacyname] Legacy
The legacy system has been updated with patch 1.2
- If you reach level 50 with a certain race you will 'unlock' it and can then use that race for any class/faction in future characters
- Achieving more legacy levels will give you access to unique powers and bonuses as well as fittings for your ship
( Will go more into the Legacy System later )
- A legacy name is a server-wide surname used by all (current & future) characters on your server
-
 GUILD
GUILD- A guild is a group of individuals who have joined forces under the same flag to achieve common goals
- A guild can be created at your capital city, Coruscant or Dromund Kaas
- If you are Republic look for Lieutenant Kyndern (-1143, 1417) Who can be found at the desk behind the Galactic Market Kiosks in the Senate Commercial District
- Locate and talk to the guild registrar in the main city to form a guild
- You must have 4 players (including yourself) in your party to create the guild
- Once created all 4 members will be part of the new guild, the person who created it will be the guild leader
- To invite more members to your guild type /ginvite [name]
- To quit your current guild type /gquit
- To talk in your guild channel type /g
Guild Functionality – Guilds are important to the long term health of any MMORPG. We have a huge list of guild centric features. This will be an ongoing effort that will probably never end. Guild banks are the first thing we’ll be delivering in our plans for increased guild functionality. Eventually we even want to deliver on the promise of the long hinted at “Guild Capital Ships”. - James Ohlen, Game Director
- A guild is a group of individuals who have joined forces under the same flag to achieve common goals
-
STATS
PRIMARY:- Aim - Affects bonus ranged damage and bonus ranged crit & tech healing
- Cunning - Affects bonus tech damage and bonus tech crit & tech healing
- Endurance - Affects bonus health and health regeneration
- Strength - Affects bonus melee damage and bonus melee crit
- Willpower - Affects bonus force damage and bonus force crit & force healing
BONUS PER POINT:
- Aim +0.2 Ranged damage
- Cunning +0.2 Tech damage
- Endurance +10 Hit Points
- Strength +0.2 Melee damage
- Willpower +0.2 Force damage
- At level 50 every 140 primary stat points you gain 1% Crit
SECONDARY:
- Absorption - Reduces the damage taken when an attack gets through your shield
- Accuracy - Hit Rating and spell penetration
- Alacrity - Reduces cast and activation times
- Armor - Reduces Physical and Kinetic Damage taken (Tech and Force are both Kinetic unless stated otherwise)
- Crit - Melee, Ranged and Healing critical chance
- Defence - Increases Parry & Deflect chance
- Expertise - PvP Stat Reduces damage taken and increases all damage and healing
- Power - Increased melee, force and tech damage/healing
- Presence - Affects companion bonus healing, extra companion health and extra companion damage
- Shield - Increased chance for shield to activate upon attack
- Surge - Increased critical damage and heals
CLASS PRIMARY STATS
- Jedi Knight - Strength
- Jedi Consular - Willpower
- Trooper - Aim
- Smuggler - Cunning
- Sith Warrior - Strength
- Sith Inquisitor - Willpower
- Bounty Hunter - Aim
- Imperial Agent - Cunning
-
 CREW SKILLS
This section has moved to another thread due to its size.
Please click HERE to learn about Crew Skills. -
 TRADE
TRADE- The channel for Trade is /3
- To link an item in the chat simply [sHIFT+LEFTCLICK] it
- To split a stack of items (say you have 20 crystals) simply hold [sHIFT+RIGHTCLICK] then drag the cursor into an inventory space. Enter the amount you want and it will then place the split stack into an empty inventory space.
- Trading with players can be done only when the player you want to trade with is in range.
- To trade with a player simply select the player you want to trade with and right click his player portrait and select Trade.
- The player will then receive a message asking whether he would like to open trade with you, once he accepts you can trade items (provided they aren't soulbound) and credits.
THE GTN (GALACTIC TRADE NETWORK)
- The GTN is the place you go to place bids or sell items with people across the galaxy.
- As a buyer you can either place a bid or buy it out. If you choose to place a bid you must enter your buying price (which must be higher than the previous) and select submit.
- Placing a bid does not guarantee you will receive the item as another player can out bid you. If you are out bid you are refunded your money through the mail and you can choose to place another if you wish.
- Bids last for a set duration defined by the seller. Once the period ends, the person with the highest bid receives the item through the mail system.
- The buyer can cancel the bid at any time, the highest bidder will then be refunded.
- You can only buy-out a bid if the seller has allowed you to do so. The buy-out price is a set price determined by the seller.
- Once you buy-out the item for sale, all (if any) bids are cancelled and you receive the item through the mail system.
- A seller can place a buy-out option and auction it off at the same time, they can also do each separately.
- Always check the price and quantity of the item before buying something to make sure you aren't getting ripped off.
- GTN's only work with players who are on the same faction as you. So Empire players can't sell to Republic players UNLESS you visit an independant/neutral trade hub which caters for both.
- These neutral trade hubs can be found on Nar Shadaa
- The channel for Trade is /3
-
 COMPANIONS
- For a list of all companions and their traits please look HERE
- You can view your companions abilities by looking in your own skill sheet and selecting the companion tab.
- Companions can be sent to sell all the grey items in your inventory. Simply hit 'N' to open up the companion window and click the icon below the orange head. You will then have to confirm and it will take your companion approximately 3 minutes to complete.
- Companions can be sent to gather resources and other items from your crew skills. They can however fail and come back with nothing. To do this open your companion window, select the skill and choose a mission to send it on. It will cost a small amount of money and take 3 minutes or more.
- Companions can have their weapons and armour upgraded just as you can. Be sure to keep your companion up to date with the latest gear in order to progress quickly. In order to change your companions setup your companion must be by your side or you have to be on your ship. Open up the character sheet and select companion tab along the bottom.
- To revive your companion after defeat simply walk over to it and right click the corpse. You must be out of combat.
- You can assign your companions skills to your action bars if you click the small '+' icon on your companions character pane.
- Often your companion will want to talk with you in private. Head to a Cantina or your space ship to initiate the chat
- Companions gain and lose affection during story scenes depending on what choices you make. If there is an easy way to see how this happens, I havent seen it. For now you will simply have to make an educated guess based on your companion's personality. If they are aggressive they will often react positively to the darkside choices and vice versa.
- A positive companion affection, as far as I'm aware, increases the crit chance of items being made and the time to make said items.
- For a list of all companions and their traits please look HERE
-
 COMPANION LIST
Note: When you obtain your ship you will obtain your very own butler droid who says he isn't usable in combat but actually is. He can heal and smack the enemy around a little. Though he is pretty lame and isn't recommended. This droid can also be sent on crew skill tasks.- C2-N2, (Droid) - Obtained when you are given your ship - REPUBLIC
- Combat Style: Healer/Ranged DPS
- Armor: Droid Parts
- Weapon type: Blaster Pistol
- Primary Stat: Aim
- Secondary Stat: Endurance
- Crew Skills: NA
- Gifts loved: Cultural Artifacts > Technology > Republic Memorabilia
- 2V-R8, (Droid) - Obtained when you are given your ship - EMPIRE
- Combat Style: Healer/Ranged DPS
- Armor: Droid Parts
- Weapon type: Blaster Pistol
- Primary Stat: Aim
- Secondary Stat: Endurance
- Crew Skills: NA
- Gifts loved: Cultural Artifacts > Technology > Imperial Memorabilia
JEDI KNIGHT
- T7-01, (Astromech Droid) - Typhon (lvl 7 to 9)
- Combat Style: Ranged Tank
- Armor: Heavy
- Weapon type: Blaster Rifle
- Primary Stat: Aim
- Secondary Stat: Endurance
- Crew Skills: +10 Bioanalysis Efficency, +2 Slicing Critical
- Gifts loved: Technology
- Kira Carsen, (Female Human - Romance-able) - Courscant
- Combat Style: Melee DPS
- Armor: Light
- Weapon type: Dual lightsaber
- Primary Stat: Willpower
- Secondary Stat: Endurance
- Crew Skills: +5 Synthweaving Critical, +1 Treasure Hunting Critical
- Gifts loved: Luxury & Technology
- Doc, (Male Human - Romance-able) - Balmorra
- Combat Style: Ranged Healer
- Armor: Medium
- Weapon type: Pistol
- Primary Stat: Cunning
- Secondary Stat: Endurance
- Crew Skills: +5 Underworld Tradeing Efficiency, +5 Biochem Critical
- Gifts loved: Courting & Luxury
- Sargent Rusk, (Male Chagrian) - Hoth
- Combat Style: Ranged Tank
- Armor: Heavy
- Weapon type: Sniper rifle
- Primary Stat: Aim
- Secondary Stat: Endurance
- Crew Skills: +10 Armstech Efficiency, +10 Scavenging Efficiency
- Gifts loved: Military Gear
- Lord Scourge, (male Sith Pureblood) - Hoth (Class quest right after Hoth)
- Combat Style: Melee DPS (tank)
- Armor: Heavy
- Weapon type: Lightsaber & Shield generator
- Primary Stat: Strength
- Secondary Stat: Endurance
- Crew Skills: +10 Artifice Efficiency, +10 Archaeology Efficiency
- Gifts loved: Trophy
JEDI CONSULAR
- Qyzen Fess, (male Trandoshan) - Typhon
- Combat Style: Melee Tank
- Armor: Heavy
- Weapon type: Techblade
- Primary Stat: Aim
- Secondary Stat: Endurance
- Crew Skills: +5 Bioanalysis Efficiency, +15 Archaeology Efficiency
- Gifts loved: Weapon > Military Gear & Underworld Good
- Zenith, (male Twilek) - Balmorra (Awarded toward end of Balmorra class missions)
- Combat Style: Ranged DPS
- Armor: Medium
- Weapon type: Sniper Rifle
- Primary Stat: Cunning
- Secondary Stat: Endurance
- Crew Skills: +15 Treasure Hunting Efficiency, +1 Underworld Trading Critical
- Gifts loved: Imperial Memorabilia > Weapon
- Lt Iresso, (male Human - Romance-able) - Hoth (Awarded at the end of Hoth class storyline)
- Combat Style: Ranged tank
- Armor: Heavy
- Weapon type: Blaster rifle
- Primary Stat: Aim
- Secondary Stat: Endurance
- Crew Skills: +2 Critical Armstech,+2 Critical Scavenging
- Gifts loved: Trophy > Republic Memorabilia
- Tharan Cedrax, (male Human) - Nar Shaddaa
- Combat Style: Ranged Healer/Techie
- Armor: Medium
- Weapon type: Pistol
- Primary Stat: Cunning
- Secondary Stat: Endurance
- Crew Skills: +10 cybertech efficiency, +10 slicing efficiency
- Gifts loved: Luxury > Technology
- Nadia Grell, (female Sarkhai - Romance-able) - Belsavis ( anywhere from lvl 40-45)
- Combat Style: Melee Dps
- Armor: Light
- Weapon type: Double blade saber
- Primary Stat: Willpower
- Secondary Stat: Endurance
- Crew Skills: +10 Synthweaving, +2 Critical Diplomacy
- Gifts loved: Cultural Artifact & Courting > Republic Memorabilia
TROOPER
- Aric Jorgan, (male Cathar - Romance-able) - Ord Mantell
- Combat Style: Ranged DPS
- Armor: Heavy
- Weapon type: Blaster Cannon
- Primary Stat: Aim
- Secondary Stat: Endurance
- Crew Skills: +10 Armstech Efficiency, +2 Diplomacy Critical
- Gifts loved: Weapon & Military Gear
- Tanno Vik, (male Weequay) - Balmorra (Demolitions expert)
- Combat Style: Melee Tank,
- Armor: Heavy
- Weapon type: Vibro Sword
- Primary Stat: Aim
- Secondary Stat: Endurance
- Crew Skills: +5 Critical Armormech,+1 Critical Underworld Trading
- Gifts loved: Underworld Goods > Weapon
- M1-4X, (Assault Droid) - Nar Shaddaa
- Combat Style: Ranged DPS
- Armor: Heavy
- Weapon type: Blaster Rifle or Pistol
- Primary Stat: Aim
- Secondary Stat: Endurance
- Crew Skills: +5 Cybertech Efficiency,+5 Critical Scavenging
- Gifts loved: Republic Memorabilia > Technology & Cultural Artifact
- Elara Dorne, (female human - Romance-able) - Taris (By the book soldier)
- Combat Style: Ranged Healer
- Armor: Heavy
- Weapon type: Blaster Pistol
- Primary Stat: Aim
- Secondary Stat: Endurance
- Crew Skills: +10 Biochem Efficiency, +10 Bioanalysis Efficiency
- Gifts loved: Luxury > Republic Memorabilia, Imperial Memorabilia & Technology
- Yuun, (male Gand) - Hoth (37-41)
- Combat Style: Melee DPS
- Armor: Medium
- Weapon type: ElectroStaff
- Primary Stat: Aim
- Secondary Stat: Endurance
- Crew Skills: +10 Investigation Efficiency, +10 Slicing Efficiency
- Gifts loved: Technology, Cultural Artifact & Trophy
SMUGGLER
- Corso Riggs (male human - Romance-able) - Ord Mantell
- Combat Style: Ranged Tank
- Armor: Heavy
- Weapon type: Blaster Pistols and Blaster Rifles
- Primary Stat: Aim
- Secondary Stat: Endurance
- Crew Skills: +5 Underworld Trading Efficiency, +5 Armstech Critical
- Gifts loved: Weapon > Military Gear
- Akavi Spaar, (female Mandalorian - Romance-able) - Balmorra (Republic Side)
- Combat Style: Melee DPS
- Armor: Heavy
- Weapon type: Electrostaff
- Primary Stat: Aim
- Secondary Stat: Endurance
- Crew Skills: +10 Armormech,+2 Critical Bioanalysis
- Gifts loved: Weapon > Military Gear & Trophy
- Bowdaar, (male Wookie) - Nar Shaddaa
- Combat Style: Melee Tank
- Armor: Heavy
- Weapon type: Vibrosword
- Primary Stat: Strength
- Secondary Stat: Endurance
- Crew Skills: +10 Cybertech Efficiency, +10 Scavenging Efficiency
- Gifts loved: Cultural Artifact & Luxury > Trophy & Weapon
- Risha, (female Human - Romance-able) - Alderaan
- Combat Style: Ranged DPS
- Armor: Medium Armor
- Weapon type: Sniper Rifle
- Primary Stat: Cunning
- Secondary Stat: Endurance
- Crew Skills: +15 Diplomacy, +1 Critical Slicing
- Gifts loved: Underworld Goods, Luxury & Cultural Artifact
- Guss Tuno, (male Mon Calamari) - Hoth
- Combat Style: Healer
- Armor: Medium
- Weapon type: Blasters
- Primary Stat: Cunning
- Secondary Stat: Endurance
- Crew Skills: +10 Underworld Trading Efficiency, +2 Investigation Critical
- Gifts loved: Underworld Goods > Tech & Luxury
SITH WARRIOR
- Vette, (female Twilek - Romance-able) - Korriban (Pirate)
- Combat Style: Ranged DPS
- Armor: Medium
- Weapon type: Dual Pistols
- Primary Stat: Cunning
- Secondary Stat: Endurance
- Crew Skills: +5 Underworld Trading Efficiency, +5 Treasure Hunting Critical
- Gifts loved: Underworld Goods > Cultural Artifact
- Jaesa Willsaam, (female Human - Romance-able) - Hutta
- Combat Style: Melee DPS
- Armor: Light
- Weapon type: Polesaber
- Primary Stat: Willpower
- Secondary Stat: Endurance
- Crew Skills: +5 Archaeology Efficiency, +5 Synthweaving Critical
- Gifts loved: Weapon > Luxury & Trophy
- Malavi Quinn, (male Human - Romance-able) - Balmorra - (Imperial Officer)
- Combat Style: Ranged Healer/DPS
- Armor: Medium
- Weapon type: Blaster Pistol, Vibroknife
- Primary Stat: Cunning
- Secondary Stat: Endurance
- Crew Skills: +10 Armstech Efficiency, +10 Diplomacy Efficiency
- Gifts loved: Imperial Memorabilia, Military Gear & Weapon
- Lieutenant Pierce - (male Human - Romance-able) - Taris - Imperial Trooper
- Combat Style: Ranged Tank
- Armor: Heavy
- Weapon type: Blaster pistol or Rifel and Shield Generator
- Primary Stat: Aim
- Secondary Stat: Endurance
- Crew Skills: +10 Cybertech Efficiency, +2 Investigation Critical
- Gifts loved: Weapons & Military Gear
- Broonmark, (male Talz) - Hoth
- Combat Style: Melee Tank
- Armor: Heavy
- Weapon type: Vibroswoard & Shield Generator
- Primary Stat: Strength
- Secondary Stat: Endurance
- Crew Skills: +10 Scavenging Efficiency, +2 Bioanalysis Critical
- Gifts loved: Trophy & Weapon > Technology & Republic Memorabilia
SITH INQUISITOR
- Khem Val, (male dashade) - Korriban ("Force eater")
- Combat Style: Melee Tank
- Armor: Heavy
- Weapon type: Vibrosword and Shield Generator
- Primary Stat: Strength
- Secondary Stat: Endurance
- Crew Skills: +15 Artifice Efficiency, +5 Investigation Efficiency
- Gifts loved: Cultural Artifact > Weapon
- Andronikus Revel, (male Human - Romance-able) - Tatooine (smuggler/pirate)
- Combat Style: Ranged DPS
- Armor: Medium
- Weapon type: Dual Blaster pistols
- Primary Stat: Cunning
- Secondary Stat: Endurance
- Crew Skills: +2 Slicing Critical, +2 Underworld Trading Critical
- Gifts loved: Weapon > Underworld Goods & Military Gear
- Ashara Zavros, (female togrunta - Romance-able) - Taris
- Combat Style: Mele DPS (jailbait jedi, a bit of a goodie-two-shoes)
- Armor: Medium
- Weapon type: Dual LightSaber
- Primary Stat: Willpower
- Secondary Stat: Endurance
- Crew Skills: +10 Synthweaving Efficiency, +10 Diplomacy Efficiency
- Gifts loved: Republic Memorabilia
- Talos Drellik, (male Human) - Hoth
- Combat Style: Ranged Healer
- Armor: Medium
- Weapon type: Blaster and Shield Generator
- Primary Stat: Cunning
- Secondary Stat: Endurance
- Crew Skills:+5 Treasure Hunting Efficiency, +5 Archaeology Critical
- Gifts loved: Cultural Artifact > Imp/Rep Memorabilia & Luxury
- Xalek, (male kaleesh) - After Voss
- Combat Style: Ranged DPS-Caster (Sith Sorceror)
- Armor: Light
- Weapon type: Lightsaber and Shield Generator
- Primary Stat: Willpower
- Secondary Stat: Endurance
- Crew Skills: +10 Bioanalysis Efficiency, +2 Scavenging Critical
- Gifts loved: Weapon & Military Gear
BOUNTY HUNTER
- Mako, (female Human - Romance-able) - Hutta
- Combat Style: Ranged Healer
- Armor: Medium
- Weapon type: Blasters
- Primary Stat: Cunning
- Secondary Stat: Endurance
- Crew Skills: +5 Cybertech Efficiency, +15 Slicing Efficiency
- Gifts loved: Technology > Underworld Goods
- Blizz, (male jawa) - Hoth
- Combat Style: Ranged Tank
- Armor: Heavy
- Weapon type: Blaster Pistol
- Primary Stat: Aim
- Secondary Stat: Endurance
- Crew Skill: +15 Armormech Efficiency, +1 Armstech Critical
- Gifts loved: Technology & Underworld Goods
- Skadge, (male Houk) - Belsavis
- Combat Style: Melee Tank
- Armor: Heavy
- Weapon type: Techblade
- Primary Stat: Aim
- Secondary Stat: Endurance
- Crew Skills: +10 Scavenging Efficiency, +2 Treasure Hunting Critical
- Gifts loved: Weapon > Trophy & Underworld Goods
- Torian Caldera, (male Human, - Romance-able) - Taris - (mandalorian)
- Combat Style: Melee DPS
- Armor: Heavy
- Weapon type: Techblade
- Primary Stat: Aim
- Secondary Stat: Endurance
- Crew Skills: +10 Investigation Efficiency, +2 Bioanalysis Critical
- Gifts loved: Military Gear, Trophy & Weapons
- Gault, (male devorian) - Tattooine
- Combat Style: Ranged DPS
- Armor: Medium
- Weapon type: Rifle
- Primary Stat: Cunning
- Secondary Stat: Endurance
- Crew Skills: +10 Underworld Trading Efficiency, +2 Biochem Critical
- Gifts loved: Luxury > Underworld Goods
IMPERIAL AGENT
- Kaliyo Djannis, (female Rattataki - Romance-able) - Hutta
- Combat Style: Ranged Tank
- Armor: Heavy Armor
- Weapon type: Pistol and a shield generator
- Primary Stat: Aim
- Secondary Stat: Endurance
- Crew Skills: +10 Armstech Efficiency, +2 Underworld Trading Critical
- Gifts loved: Weapon > Underworld Goods
- Vector Hyllis, (male human - Romance-able) - Alderaan
- Combat Style: Melee DPS
- Armor: Medium
- Weapon type: Electrostaff, Generator
- Primary Stat: Willpower
- Secondary Stat: Endurance
- Crew Skills: +5 Bioanalysis Efficiency, +5 Diplomacy Critical
- Gifts loved: Cultural Artifact > Imperial Memorabilia
- Doctor Lokin, (male Human) - Taris
- Combat Style: Melee Tank
- Armor: Light
- Weapon type: Vibrosword and Shield Generator
- Primary Stat: Cunning
- Secondary Stat: Endurance
- Crew Skills: +15 Biochem Efficiency, +10 Investigation Efficiency
- Gifts loved: Technology > Military Gear & Technology
- Note: Doctor Loken starts as a healer. He gains the transformation ability after gaining affection with him.
- Ensign Raina Temple, (female Human - Romance-able) - Quesh
- Combat Style: Ranged Healer
- Armor: Medium
- Weapon type: Pistol and Shield Generator
- Primary Stat: Cunning
- Secondary Stat: Endurance
- Crew Skills: +10 Scavenging Efficiency, +2 Armormech Critical
- Gifts loved: Imperial Memorabilia > Military Gear
- Scorpio, (droid) - Belsavis
- Combat Style: Ranged DPS
- Armor: Heavy
- Weapon type: Blaster Pistol & Shield generator
- Primary Stat: Aim
- Secondary Stat: Endurance
- Crew Skills: +10 Cybertech Efficiency, +2 Slicing Critical
- Gifts loved: Technology > Weapon
- C2-N2, (Droid) - Obtained when you are given your ship - REPUBLIC
-
^ I approve of this message since I live there!!!!
-
 PLAYER VERSUS PLAYER (PVP)
- To talk on the PvP channel type /2
- To 'Flag' yourself for PvP use the small icon under your character portrait (your icon will be either empire or republic)
- If you are flagged a red circle will be highlighted on your icon
- Being flagged means anyone on the opposite faction can attack you. If you are on a PvP server this icon is always on above level 10 (need confirmation)
- To participate in a PvP battleground all you have to do is click the small icon in the bottom right corner of the minimap. The icon should be of your faction, republic or empire.
- You can also select the MVP (most valuable player) in your team once the match has finished. The MVP will receive extra rewards.
- Getting killed in our outside a battleground by an enemy player has no real penalty. You don't lose any credits and you don't lose your gear. You only lose a little pride :P.
- Take your time to look at the map and understand the objectives on the loading screen. It will take a few runs before you start getting the hang of things.
- As always, go for the healer first!
You can buy several types of PvP gear from various vendors. This is what is available to you by using the commendations that you acquire by partaking in pvp ques.
- Obroan PvP Gear ( Basic Gear )
- Head Gear - 1,000 Warzone Coms
- Chest piece - 1,000 Warzone Coms
- Bracers - 600 Warzone Coms
- Belt - 600 Warzone Coms
- Gloves - 1,000 Warzone Coms
- Lower Robes - 1,000 Warzone Coms
- Boots - 1,000 Warzone Coms
- Implants - 800 Warzone Coms
- Earpiece - 800 Warzone Coms
- Main hand weapon - 1,250 Warzone Coms
- Offhand weapon - 1,250 Warzone Coms
- All Obroan Relics - 700 Warzon Coms Each
- Brutalizer PvP Gear ( Advanced Gear )
- Head Gear - 2,500 Ranked Warzone Coms AND 1 Obroan Head Gear of the same type
- Chest Piece - 2,500 Ranked Warzone Coms AND 1 Obroan Chest Piece of the same type
- Bracers - 1,250 Ranked Warzone Coms AND 1 Obroan Bracers of the same type
- Belt - 1,425 Ranked Warzone Coms AND 1 Obroan Belt of the same type
- Gloves - 2,500 Ranked Warzone Coms AND 1 Obroan Gloves of the same type
- Lower Robes - 2,500 Ranked Warzone Coms AND 1 Obroan Lower Robes of the same type
- Boots - 2,500 Ranked Warzone Coms AND 1 Obroan Boots of the same type
- Implants - 1,400 Ranked Warzone Coms AND 1 Obroan Implants of the same type
- Earpiece - 1,400 Ranked Warzone Coms AND 1 Obroan Earpiece of the same type
- Main hand weapon - 3,500 Ranked Warzone Coms AND 1 Obroan Main Hand Weapon of the same type
- Offhand weapon - 3,500 Ranked Warzone Coms AND 1 Obroan Offhand Weapon of the same type
- All Brutalizer Relics - 1,300 Ranked Warzone Coms AND 1 Obroan Relics of the same type
You can also buy other commendations with commendations. For example, if you visit the 'PvP Items' vendor you can buy the following:
1 Planetary commendation for 40 Warzone commendations
10 Warzone commendations for 10 Ranked Warzon commendations
10 Ranked Warzone commendations for 30 Warzone commendations ( Available at Valor Rank 40 )
Your primary focus will be wanting to buy the Obroan set working your way up to the Brutalizer set. -
 THE STORY
- To skip through dialogue simply hit the space bar
- Most of the time 1 means light side, 2 is neutral and 3 is dark side. However you should always pay attention just in case it swaps around.
- Subtitles can be added to all chat dialogue in the options window under preferences
- When you are in a party you can choose to either talk to a contact separately or with the rest of your group. To talk with your group a member must right click the contact and wait until all party members have also right clicked the contact. Green ticks will be shown by the portraits of those who have accepted. Once all have accepted or you are tired of waiting hit start conversation.
- If a group mate is far away from the contact but you are near your group mate will be given the option to use the holocom to talk to the contact. Though remember, this requires at least one of you talking face to face.
- Throughout the story, once in a while you will be only given two options to choose from. A lightside choice and a dark side choice. If you can't tell which is which, you can hover over each option and a small icon will display in the centre.
- Choosing between Dark Side and Light Side options will increase your Light and Dark rating in the form of points. You can view your current alignment in the character window 'C'
- You can go up and down the meter SIMULTANEOUSLY so you aren't forced to stay with one alignment for your character. Meaning if you are primarily a Light Side character and gain Dark Side points, these points aren't taken from your Light Side score, rather they just add to your Dark Side score.
- Each alignment has ranks. You start neutral and the amount of points required to get to rank 1 of the Light Side is 1'000. Rank 1 of the Dark Side is -1'000.
- The amount of points between each rank interval remains consistent for both sides. Meaning it isn't any easier to pick one over the other.
- Some equip-able items in game require you to be at a certain rank within the Dark or Light Side. For example a red crystal for your light saber is forbidden to rank 1 or above in the Light Side.
- Light Side - Dark Side -
 GROUPING
- To talk to your group type /p
- The maximum number of people you can have in a single group is 4 players (including yourself, so 3 players and you)
- You can turn your group into an 'ops' if you are the party leader. If you are simply right click your portrait and use the menu to select turn into ops.
- Ops groups can have up to 16 players maximum in them and are used primarily for operations
- When you are invited to a group you will be asked whether you would like to join the same instance as the person who invited you. Click yes otherwise you won't be able to see your teammate. If their instance is full they will be asked to join your instance instead.
- To leave a group, right click your character portrait, select group and click 'Leave Group'
- To add a player that you can see to the group, simply select them and click on the purple plus (+) icon above their character portrait.
- To add a player that you can't see to the group, simply type /invite Inferna (replace Inferna with the name of whoever you are inviting)
- To promote someone as the new Group Leader simply right click their nameplate and select 'Make Group Leader'
- To remove someone from the group, right click the persons nameplate you want removing and select 'Kick From Group'
- Grouping with players can award you with special 'Social Points'. Social Points are rewarded when you win a conversation roll against other players in your group who are part of the same conversation.
- Social Points are also awarded when you complete group content or view a private instance as a spectator
- You also gain half the amount of social points when you lose the roll.
- Winning a social roll against another player in your team means you will talk to the contact and whatever you chose to say will be said.
- Rolls are completely RNG (random number generated)
- Social Points can be spent at special 'Social Vendors' for goodies!
- You can pick up defeated group members at anytime, provided you are out of combat. Simply run over to them and right click.
- If a teammate is in a different instance than you, when they talk it will display which they are in on the chat panel beside their name. Alternatively you can look at the map 'M' and in the bottom right corner will display your area. Use the drop down menu to locate friends, guild and group members. To change simply click which one you want to join.
- Swapping instances incurs a 30 minute delay before you can use it again.
- Flashpoints - (instances) Every Flashpoint takes a group of Imperial or Republic players through its own self-contained adventure, culminating in one of several outcomes based on player choices. You won’t have to miss out on any of the story, though – Flashpoints exist in specially instanced parts of the galaxy and can be repeated as often as you’d like. Flashpoints feature enemies that require skill and cooperation to defeat, and are much more challenging than single-player missions, but they offer valuable loot and rewards. Gather up your allies and get ready for explosive multiplayer action in Flashpoints!
- Operations - (raids) are large-scale multi-group missions where you will join your Republic or Imperial allies to confront the most dangerous threats in the galaxy. Each story-driven Operation is available to both factions and is designed to challenge groups of either eight or sixteen players to use their skills, wits, and teamwork to ensure that they successfully complete the mission while still being accessible to newcomers to the genre.
- To talk to your group type /p
-
 LOOTING
- You can enable auto loot in preferences in the game menu, simply right click to take everything instantly
- You can enable area loot in preferences in the game menu, when you loot you will take everything from the target and all around it
TYPES OF LOOT
- Defeated enemies with a light blue vertical beam protruding from them have common loot (grey, white items and credits)
- Defeated enemies with a green vertical beam protruding from them have premium loot
- Defeated enemies with a dark blue vertical beam protruding from them have prototype or custom loot
- Defeated enemies with a purple vertical beam protruding from them have artifact loot
- Defeated enemies with a yellow vertical beam protruding from them have loot which contributes to your quest or commendations
ITEM QUALITY
- CHEAP Items are junk and should be sold to a vendor for cash
- STANDARD Items generally have a use whether it's a crafting material or an equipable item
- PREMIUM Items are uncommon items, rarer than white items and have better stats
- PROTOTYPE Items are rarer than green items and have better stats
- ARTIFACT Items are epic items and have higher stats than blue
- CUSTOM Items are items which are fully modifiable, more info below!
- Items increase in the following order: CHEAP -> STANDARD -> PREMIUM -> PROTOTYPE -> ARTIFACT
- [CUSTOM] can't be placed in the above rankings as they could theoretically be better or worse depending on their mods.
- When a monster drops an uncommon item and you are in a group, everyone will be eligible to 'roll' for the item. Rolling is completely random and whoever rolls the highest, wins the item.
- There are four loot options for when such an event occurs, need, greed, reverse engineer or pass.
- Need - You should only click need if you can use the item which is up for grabs and only if it provides better stats than your current gear. If a crafting material drops and you think you need it, ask the group first because others that also may have needed it may have clicked greed. If you are unsure, always ask the group if they don't mind you needing an item. usually they will say go ahead. The same goes for companion gear, don't need it if a real player needs it. If everyone has selected greed, ask you group whether it's ok to need.
- Greed - You should click greed if the only reason for wanting the item is to sell it, to reverse engineer it or give it to a friend/alt. Crafting items you can't use should always be greeded.
- Pass - Clicking pass in the loot panel will drop you out of the roll. Meaning you won't have a chance of getting the item. Many people do this because they don't want to fill up their inventory with things they don't need. Or they are just being kind.
- Reverse Engineer - If a player in the group has the required crafting skill for the item and a high enough skill level, there is an option to reverse engineer the item. If this player wins the roll the item will then be destroyed and the winner will receive crafting materials. (see crew skills - reverse engineering for more info)
- Abusing this system (needing everything) will often get you kicked from groups and a bad reputation will follow. When you do 'need' everything you will be branded a ninja and many people will avoid playing with you.
- Some items (green and above) will bind to you upon equipping them (BoE). Once this item is equipped it can't be sold or traded to another player. It can still be sold to a vendor or reverse engineered however.
- Some items will be bound to you as you pick them up (BoP). Meaning you can't trade them to anyone else in the group, so make sure you use need or greed carefully! These items can also be sold to a vendor or reverse engineered.
STANDARD RULES OF LOOTING:
- Never need an item you can't use if another player in the team needs and can use it
- Never need an item for the sole intent of wanting to sell it to a vendor
- Never need an item for your companion if there is another player in the group who can use it and also needs
- Never need an item for yourself if the item is several levels above your own and someone else in the flashpoint can use it
- If any of the above occur and you feel you want it, the best thing to do is 'Greed' or ask if anyone else wants it and ask whether you may need.
CUSTOM ITEMS
- CUSTOM items are the new item rarity within the game
- The idea behind custom armour and weapons is so you can have the gear you find aesthetically pleasing ("looks cool" in layman's terms) and it will still be viable in combat by modding the items regularly.
- Any items shown with an orange border are fully moddable
- These new fully modifiable orange items came from old PROTOTYPE items (blue) and their colors where swapped
- This was done to create a more unique identity for fully modifiable items
- Remember orange items do not mean legendary!
- Custom gear is fairly common in the game
- It can be obtained through class quests around level 8, as social gear, as space quest rewards and as light side / dark side gear.
- Custom gear is also the typical gear found in flashpoints as rewards for heroic missions
- Several pieces can be obtained through using planetary commendations
- You can enable auto loot in preferences in the game menu, simply right click to take everything instantly
-
QUESTING & LEVELING
- You can enable area loot in preferences in the game menu, when you loot you will take everything from the target and all around it
- NPC's that have 3 orange lines above their head in the form of a triangle means they have a quest for you.
- NPC's that have 3 grey lines above their head in the form of a triangle means they have a quest for you but it isn't available to you yet due to your level or progress with other quests.
- NPC's that have three orange lines above their head in the form of a triangle and a glowing green center means the quest is completed, talk to them for a reward.
- Make sure to make use of your out of combat heal every time you finish a tough fight, this will help you progress faster
- Use the map 'M' to see where objectives are located in the world and work out the fastest route to get there, or the most scenic. Whatever floats your boat!
- Hover over objectives on the map to see a more detailed description and sometimes the area you need to be in to find the enemy.
- When you come to a new town or location always visit the taxi service to unlock it for future travel and visit the binding plinth to enable fast travel to that location.
- Class Trainers are visible by the orange arrow they have above their heads, if there is a green star underneath it means there are new skills to train
- Once you reach level 10 and do the quest which will place you in your desired branch, new tabs will unlock on the bottom of the skill trainers window. For example a Jedi Consular who has picked Sage will have a Consular tab which gives abilities to both the sage and shadow but you will also have a tab called Sage with more unique spells the Shadow cant obtain and vice versa.
- Make sure to REPAIR every time you go to a vendor, there is a button once you open up a trade window to 'repair all' in the bottom left corner. This will keep you progressing smoothly
- Keep fully stocked on MedPacks, it is easy to get overwhelmed on this game and you never know when you will need that extra boost of HP to win a fight.
- When you obtain your first companion, its always best to send them in first on difficult fights as you can simply pick them back up once the fight has finished
- You can move your companion out of harms way of special enemy AoE attacks by setting them as passive and moving away from the target. This is done in the companion window and can help against really tough foes!
- Kill the weakest first! If you are about to jump into a fight with one elite and four minions, then try to CC (crowd control, hold, stun, snare etc) the Elite and dispatch the minions as quickly as you can before the Elite has time to attack
- Make use of your terrain! You can Force push enemies off cliffs and they will die on hitting the ground
- Often on your way to a certain area there might be enemies on the way, although attacking these enemies isn't needed you can often trigger a bonus quest to kill 5 or so for more exp.
- Try to complete bonus quests whenever you get the chance, it usually doesn't take long and the reward is great
- Keep an eye out for Lore Objects throughout the world. Simply interact with them to gain a new piece of lore and some tasty experience as well!
- When you complete a quest that gives you an item as a reward but your inventory is full, you wont receive the item right away. Simply sell some goods then look at the quest tracker on the upper right corner of the screen. You will see something along the lines of '1 quest completed' click it, then claim your reward!
- Sometimes when you are on a quest you will be given a device or an object to use. To find mission items, open your inventory (I/B) and swap tabs to Mission Items. Here you will find all the quest items you pick up in your journey.
- Mission Items will be removed upon completion of the quest, or quest chain.
- Heroic Areas - Are areas on the map with powerful enemies. Often quests take you to them and a teammate is needed to help progress through. Though soloing is possible.
- You can enable area loot in preferences in the game menu, when you loot you will take everything from the target and all around it
-
 THE USER INTERFACE (UI)
- To reset the UI press [CTRL+U] twice (helps if it freezes)
- To hide/unhide the UI press [ALT+Z]
- Enter UI editing mode by pressing the 'Edit Layout' button in the main menu (reachable by hitting ESC), or by hitting the small button next to the quickslots and choosing "edit layout".
- Whilst in editing mode, click, hold and drag your cursor on certain UI elements to drag them around the screen.
- You can resize and flip some elements of the UI while in edit mode. Elements can be resized individually, or grouped and resized together.
- You can modify the UI of other game mechanics by using the drop down list to select another aspect of gameplay (e.g. space combat).
- You can choose to save and load UI profiles so they can be used by other characters.
- To change the max distance you can zoom out, head into options (esc), then into preferences and then use the slider to increase or decrease the amount.
- You can create new chat tabs or edit current ones by right clicking on the general tab or any other new tabs.
- You can modify the opacity of the chat window background in options and under preferences
- You can drag the chat panel to a desired location by left clicking and holding on the general tab and then dragging
- You can access all the emotes and commands from the top left corner of the chat panel
- To minimize the chat panel, simply click the arrow located in the far upper left corner of the chat panel
- You can zoom the mini map in and out by placing your cursor over the map and using the mouse wheel
- To reset the UI press [CTRL+U] twice (helps if it freezes)
Xoza's Media Thread
in Art & Images
Posted
^ This is why you suck ! D:<